Sunday, July 29, 2012

Fleur de Lis Picture Frames

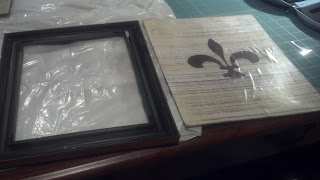
So, I was looking for something to hang on two small walls that frame an opening into my kitchen. We bought a table and decorated it, but the walls made the project look unfinished. I tried SEVERAL things (that all failed) with four dollar store mirrors. Finally, with help from my mom, I settled on something that worked - and looks ADORABLE on my wall!

The Finished Product:


What You Will Need:
  • As many dollar store frames as you want (they're only a dollar)
  • Mod Podge
  • Either a Xacto Knife, Cricut Machine, or something like it (We used the PAZZLE. It's fabulous)
  • Scrapbook paper
  • Spray Paint 
  • Hot glue gun

Let's Get Started:

1. Separate frames from the cardboard backs.
2.  Lay frames face up on a piece of cardboard or whatever you don't mind paint getting on.
3. Spray frames with spray paint. Note: I didn't particularly care if the coverage was perfect, so I didn't prime it. But, if you care, prime first, then paint.
4. While the frames are drying, mod podge scrapbook paper to the cardboard insert of the frame.


5. Use the Pazzle or whatever tool you are using to cut out a pretty shape.
6. Mod Podge the shape to the center of the cardboard insert.
7. Hot glue the insert back into the frame.
8. Hang on wall.


VOILA! Super easy. Props to my mom for not letting my throw the mirrors away when my etching project went bad! These are even cuter than my original idea.

Saturday, July 21, 2012

Hanging Bow Organizer

Remember the bows on alligator clips we made last week? Well, the ones my mom and I made are going to make their way into a 14 year old's posession. She obviously needs something to organize them on. So, we decided to give her that, too!

The Finished Product:


Here's What You Will Need:
  • 1 Canvas of any size (we bought 5 for $20 at Michael's and we used a 25% off coupon. Cha Ching!)
  • Approximately 1 yard of fabric in any color
  • Approximately 1 yard of batting 
  • A couple of yards of ribbon in any color or width that you are interested in
  • Staple gun
Let's Get Going:

Disclaimer: we just kind of winged it on this one. There are no real measurements.

1. Lay fabric face down on a large flat surface.
2. Lay batting down on top of the fabric.
3. Lay canvas face down in the center of both the batting and the fabric.
4. Cut the batting and the fabric at the same time around the outside of the canvas, we left about 3.5 inches on all sides.

5. Pull the fabric and batting together tightly around the back of the canvas.
6. Use staple gun to secure fabric to the back of the frame. Note: on the corners we folded the fabric and batting together like a present to keep it from bulging on the front.

7. Optional: Trim fabric on the back if you are a perfectionist like my mom (no one sees the back, fyi.)
8. Where you put the ribbons is up to you, we chose to put them long ways and make the canvas portrait style. You can do it however you want. Either way, secure ribbon to the back of frame with staple gun.

9. Add your hair clips! VOILA!


This project took us about ten minutes from start to finish. We had fabric, batting, the ribbon, and the staple gun at home. If you don't have a staple gun at home, you could use small finishing nails and a hammer. Since we purchased 5 canvases for about $15 (after the discount), each canvas cost approximately $3.

PS. Thanks to my mom for modeling for all of my pictures!

Sunday, July 15, 2012

Double Bow


My mom has always done my hair (everyone knows I love braids!) and made my hair accessories. For my first post, this is a great tutorial for something that is super quick and easy, and cheap (you don't really need to buy 8 colors of ribbon like we did).

THE FINISHED PRODUCT:


What you will need:
  • 1 yard plus 2.5 inches of 1.5" grosgrain ribbon in whatever color suits you
  • hair elastics (for ponytail ribbon)
  • alligator clips (for clip in ribbon)
  • fabric scissors (we use Fiskars)
  • crafting wire
  • fabric glue
  • wire cutters
  • glue gun

NOW THAT YOU HAVE EVERYTHING, LETS GET TO IT:

1. Cut 6" of wire and set aside.
2. Cut 2.5" of ribbon and set aside.
3. Take your yard of ribbon and fold it in half

4. While folded, slide wire through the fold and twist wire tightly around ribbon (still folded)

5. Open ribbon and lay flat with wire facing up.
6. Fold one side of the ribbon in so that the loop is approximately 2.5"

7. Fold it back towards the center with the same size loop remaining. You should have two loops now.

8. Repeat this process with other half of the ribbon. You should have four loops now and leftover ends. DON'T CUT THEM. We will make them pretty later!

9. The wire should be behind the ribbon. Wrap wire around the WHOLE thing tightly. Twist wire to make secure. Add a drop of hot glue to secure end of wire. Set the bow aside for now.

10. Pick up your small ribbon. 
11. Fold ribbon into thirds the long way, putting a line of hot glue inside each fold to secure.

12. Place a drop of hot glue on back of bow and secure one end of small ribbon perpendicular to the bow.
13. Cut approximately 3" of wire.
14. Wrap small ribbon tightly around the bow. Place wire on bow and hot glue the end of the small ribbon onto the wire. Hold firmly until glue dries.

15. Feed wire through the alligator clip and twist to secure. We add a drop of hot glue to keep the bow from wiggling on the clip!
16. To finish the bow, fold the end of the excess ribbon in half and cut on an angle
.
17. For nice neat ribbon that doesn't fray, my mom uses a lighter to very quickly singe the ends. It is important that it is done quickly and carefully so that we don't have any fires or burn marks!!

18. VOILA! Pretty ribbon on a clip.

note: for a bow on a ribbon, go back to step 12 and instead of adding wire before you glue the small ribbon down, add a hair tie. EASY.

We made two ribbons in 20 minutes, and we were making it up as we went. This is an EASY project. Happy bow-heading!

Saturday, July 14, 2012

Sneaky Peaky

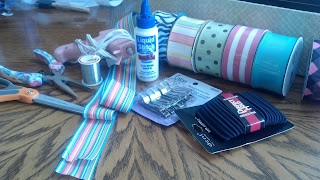
THESE ARE THE INGREDIENTS FOR MY FIRST DIY PROJECT!


You can view the actual results tomorrow!